
以前我对 Session 的理解比较模糊,只知道它与 Cookie 结合用于实现登录功能,直到我阅读了 koa-session 的源码,才更深入地理解了 Session 与 Cookie 之间的关系。
今天我们便通过解读koa-sesion的源码,来深入了解Session与Cookie的关系。
一、 为什么我们需要Session?
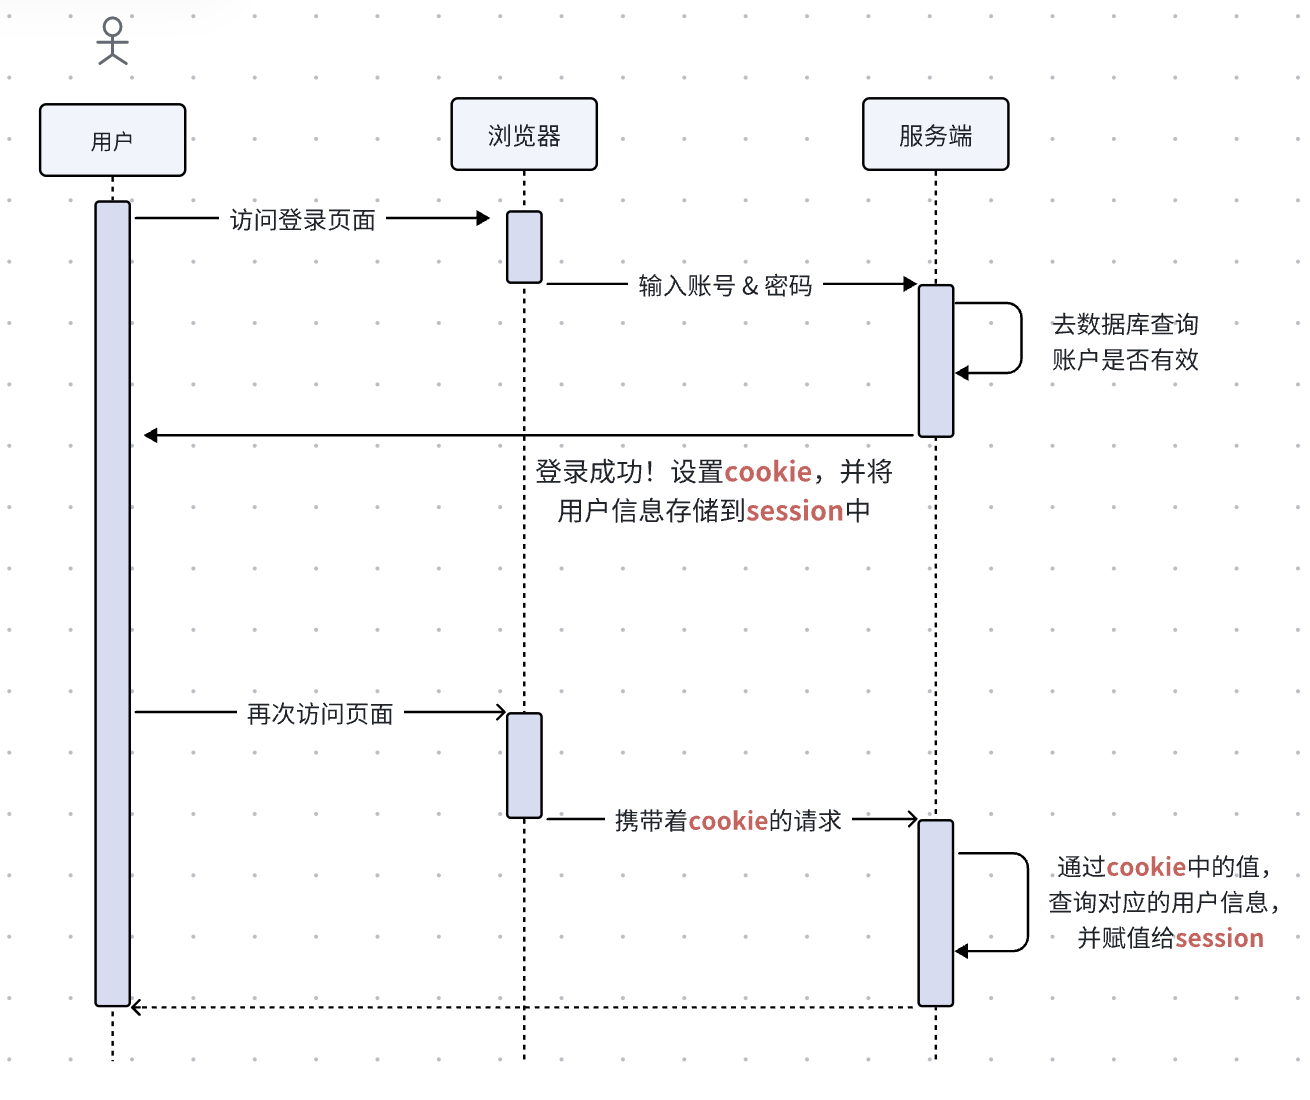
HTTP 是一种无状态协议,每个请求都是独立的,服务器无法记住之前的请求信息。这导致服务器无法识别用户身份、保持登录状态或保存用户数据。 于是,Session 应运而生。
我们先来看看下面的时序图,了解下session是如何在登录时保存用户信息,以及在后续请求中如何获取用户信息的。
通过koa-session实现简单的登录功能也很简单。
const session = require('koa-session');
const Koa = require('koa');
const app = new Koa();

// 这个是干嘛的,后面再解释
app.keys = ['some secret hurr'];

// 第一步:注册中间件
const CONFIG = {
    // cookie中的key, 默认:koa.session
    key: "your_service_sess",
    // 有效期
    maxAge: 24 * 60 * 60 * 1000,
    // 可选,默认将session值存储到cookie中,也可指定到store(比如redis)
    // store: {}
};
app.use(session(CONFIG, app));

// 第二步:给session赋值
app.use((ctx, next) => {
    if (ctx.path === '/api/login') { // 登录接口
        // 登录成功后,则用户信息存储到session中
        ctx.session.user = userInfo;
    }
    else if (ctx.path === '/api/logout') { // 退出登录
        ctx.session.user = null;
    } else { // 在其他接口中,通过session获取登录用户信息
        const user = ctx.session.user;

        // 如果没有登录则跳转到登录页面
        if (!user) {
            ctx.redirect = '/login';
        }
    }
});

app.listen(3000, () => console.log('visit https://localhost:3000'));
二、 koa-session 源码结构
koa-session 由四个文件组成,了解它们的功能后,你就能初步掌握 koa-session 的工作原理。
index.js入口文件。module.exports导出中间件formatOpts()校验opts参数 & 初始化默认值extendContext()往ctx上挂载 ctx.session、ctx.sessionOptions
lib/context.jsContextSession类,ctx.session指向的就是它的实例。ContextSession#ctxkoa.ctxContextSession#appkoa.appContextSession#opts中间件的参数ContextSession#store中间件的参数中的storeContextSession#sessionSession实例ContextSession#preHashsession的hash值ContextSession#externalKey存储在store中的key值ContextSession#get()ctx.session取值时调用ContextSession#set()ctx.session赋值时调用ContextSession#initFromCookie()从cookie中初始化值赋值给sessionContextSession#initFromExternal()从store中初始化值赋值给sessionContextSession#valid()校验cookie值是否有效或过期ContextSession#create()创建session实例ContextSession#commit()保存session到cookie和storeContextSession#save()保存session到cookie和storeContextSession#remove()删除session值,即删除cookie和store中的值ContextSession#_shouldSaveSession()判断是否需要保存session值
lib/session.jsSession类,session数据存储Session#_sessCtxcontextSession实例Session#_ctxkoa.ctxSession#_externalKey存储在store中的key值Session#_requireSave是否需要保存session值Session#isNew是否第一次赋值Session#toJSON()获取session值并去除其他不相关的属性Session#[inspect]???Session#lengthsession对象值的key数量Session#populated=!!this.lengthSession#maxAgesession有效期Session#maxAge=session有效期赋值Session#save调用this.commit,保存session值Session#regenerate调用this.commit,保存session值Session#manuallyCommit调用this.commit,保存session值Session#commit调用contextSession#commit,保存session值
lib/utils.js工具函数encode()base加密decode()base解密hash()hash函数
三、 koa-session 源码分析
总体来说,koa-session做了三件事,中间件处理、ctx.session取值、ctx.session赋值,将它们与上面的类和方法联系起来,我们也就掌握了koa-session的原理。
中间件处理
// index.js 部分代码

const CONTEXT_SESSION = Symbol('context#contextSession');
const _CONTEXT_SESSION = Symbol('context#_contextSession');

module.exports = function(opts, app) {
  // session(app[, opts])
  if (opts && typeof opts.use === 'function') {
    [ app, opts ] = [ opts, app ];
  }
  // app required
  if (!app || typeof app.use !== 'function') {
    throw new TypeError('app instance required: `session(opts, app)`');
  }

  opts = formatOpts(opts);
  extendContext(app.context, opts);

  return async function session(ctx, next) {
    const sess = ctx[CONTEXT_SESSION];
    if (sess.store) await sess.initFromExternal();
    try {
      await next();
    } catch (err) {
      throw err;
    } finally {
      if (opts.autoCommit) {
        await sess.commit();
      }
    }
  };
};

function extendContext(context, opts) {
  if (context.hasOwnProperty(CONTEXT_SESSION)) {
    return;
  }
  Object.defineProperties(context, {
    [CONTEXT_SESSION]: {
      get() {
        if (this[_CONTEXT_SESSION]) return this[_CONTEXT_SESSION];
        this[_CONTEXT_SESSION] = new ContextSession(this, opts);
        return this[_CONTEXT_SESSION];
      },
    },
    session: {
      get() {
        return this[CONTEXT_SESSION].get();
      },
      set(val) {
        this[CONTEXT_SESSION].set(val);
      },
      configurable: true,
    },
    sessionOptions: {
      get() {
        return this[CONTEXT_SESSION].opts;
      },
    },
  });
}
中间件的处理十分简单。
- 首先,通过
extendContext往ctx上挂载session和sessionOption字段,分别调用ContextSession实例的方法,然后再返回符合koa洋葱模型的方法。 next调用前:如果有store参数,则调用ContextSession#initFromExternal从store中初始化session值。next调用:这里可能会有session的读写。next调用后:调用ContextSession#commit将session值保存到cookie和store中。
ctx.session取值
由上一步可知,通过ctx.session取值实际上是调用ContextSession#get方法,所以我们来看看它的代码。
// src/context.js 部分代码
class ContextSession {

  get() {
    const session = this.session;
    // already retrieved
    if (session) return session;
    // unset
    if (session === false) return null;

    // create an empty session or init from cookie
    this.store ? this.create() : this.initFromCookie();
    return this.session;
  }


  initFromCookie() {
    debug('init from cookie');
    const ctx = this.ctx;
    const opts = this.opts;

    const cookie = ctx.cookies.get(opts.key, opts);
    if (!cookie) {
      this.create();
      return;
    }

    let json;
    debug('parse %s', cookie);
    try {
      json = opts.decode(cookie);
    } catch (err) {
      // backwards compatibility:
      // create a new session if parsing fails.
      // new Buffer(string, 'base64') does not seem to crash
      // when `string` is not base64-encoded.
      // but `JSON.parse(string)` will crash.
      debug('decode %j error: %s', cookie, err);
      if (!(err instanceof SyntaxError)) {
        // clean this cookie to ensure next request won't throw again
        ctx.cookies.set(opts.key, '', opts);
        // ctx.onerror will unset all headers, and set those specified in err
        err.headers = {
          'set-cookie': ctx.response.get('set-cookie'),
        };
        throw err;
      }
      this.create();
      return;
    }

    debug('parsed %j', json);

    if (!this.valid(json)) {
      this.create();
      return;
    }

    // support access `ctx.session` before session middleware
    this.create(json);
    this.prevHash = util.hash(this.session.toJSON());
  }

  create(val, externalKey) {
    if (this.store) {
        this.externalKey = externalKey || this.opts.genid && this.opts.genid(this.ctx);
    }
    this.session = new Session(this, val, this.externalKey);
  }

  // 判断coookie中是否有值或过期
  valid(val, externalKey) {
    // 省略部分代码
  }

}
ctx.session取值的逻辑也很简单。
- 如果数据存储在store中,上一步已经通过
initFromExternal获取,此时直接返回this.session即可。 - 否则,说明session值存储在cookie中,此时从cookie中直接获取值并通过base64解密拿到值。
ctx.session赋值
由上上步可知,通过ctx.session取值实际上是调用ContextSession#get方法,所以我们来看看它的代码。
class ContextSession {
  set(val) {
    if (val === null) {
      this.session = false;
      return;
    }
    if (typeof val === 'object') {
      // use the original `externalKey` if exists to avoid waste storage
      this.create(val, this.externalKey);
      return;
    }
    throw new Error('this.session can only be set as null or an object.');
  }
}ctx.session赋值的代码也很简单。就是调用create对session赋值。当然最后还要通过commit函数将值同步到cookie和store中。
Session类
ctx.session赋值,实际上都是通过ContextSession#create来创建一个session实例;ctx.session取值时则直接读取该实例。因此,我们也来看看Session类的实现。
// src/session.js 部分代码
const inspect = Symbol.for('nodejs.util.inspect.custom');

class Session {
  /**
   * Session constructor
   * @param {Context} ctx
   * @param {Object} obj
   * @api private
   */

  constructor(sessionContext, obj, externalKey) {
    this._sessCtx = sessionContext;
    this._ctx = sessionContext.ctx;
    this._externalKey = externalKey;
    if (!obj) {
      this.isNew = true;
    } else {
      for (const k in obj) {
        // restore maxAge from store
        if (k === '_maxAge') this._ctx.sessionOptions.maxAge = obj._maxAge;
        else if (k === '_session') this._ctx.sessionOptions.maxAge = 'session';
        else this[k] = obj[k];
      }
    }
  }

  /**
   * JSON representation of the session.
   *
   * @return {Object}
   * @api public
   */

  toJSON() {
    const obj = {};

    Object.keys(this).forEach(key => {
      if (key === 'isNew') return;
      if (key[0] === '_') return;
      obj[key] = this[key];
    });

    return obj;
  }

  /**
   * get session maxAge
   */
  get maxAge() {
    return this._ctx.sessionOptions.maxAge;
  }

  /**
   * set session maxAge
   */

  set maxAge(val) {
    this._ctx.sessionOptions.maxAge = val;
    // maxAge changed, must save to cookie and store
    this._requireSave = true;
  }
  /**
   * save this session no matter whether it is populated
   */

  save(callback) {
    return this.commit({ save: true }, callback);
  }

  /**
   * regenerate this session
   */
  regenerate(callback) {
    return this.commit({ regenerate: true }, callback);
  }

  /**
   * commit this session's headers if autoCommit is set to false
   */
  manuallyCommit() {
    return this.commit();
  }

  commit(options, callback) {
    if (typeof options === 'function') {
      callback = options;
      options = {};
    }
    const promise = this._sessCtx.commit(options);
    if (callback) {
      promise.then(() => callback(), callback);
    } else {
      return promise;
    }
  }
}

module.exports = Session;
FAQ
1、 app.keys = ['some secret hurr'] 这行代码的作用是什么?
app.keys 用于签名和加密 Cookie,确保会话数据的完整性和安全性。 如图所示,Cookie 中会多出一个 koa.sess.sig` 字段,这是对 koa.sess 的签名值,用于验证 Cookie 是否被篡改。
⚠️ 注意
只有signed=true签名才会生效。

2、session中的参数都是什么含义?
⚠️ 注意:以下选项和cookie直接相关
key、maxAge、overwrite、httpOnly、secure、signed、sameSite
| 选项 | 类型 | 默认值 | 含义 |
|---|---|---|---|
key | String | 'koa.sess' | 存储会话数据的 Cookie 名称。 |
maxAge | Number | 86400000(24 小时) | 会话的有效期,以毫秒为单位。 |
overwrite | Boolean | true | 是否覆盖同名 Cookie。 |
httpOnly | Boolean | true | 是否禁止客户端 JavaScript 访问 Cookie,防止 XSS 攻击。 |
secure | Boolean | false | 是否仅在 HTTPS 连接下发送 Cookie,防止中间人攻击。 |
signed | Boolean | true | 是否对 Cookie 进行签名,防止数据被篡改。 |
sameSite | String | null | 设置 Cookie 的 SameSite 属性,防止 CSRF 攻击。可选值:'strict'、'lax'、'none'。 |
autoCommit | Boolean | true | 是否自动提交会话数据。 |
rolling | Boolean | false | 是否在每次请求时刷新会话的有效期。 |
renew | Boolean | false | 是否在会话即将过期时自动续期。 |
store | Object | null | 自定义会话存储(如 Redis 或数据库)。 |
genid | Function | null | 自定义会话 ID 的生成函数。 |
prefix | String | '' | 会话存储键的前缀(用于自定义存储)。 |
encode | Function | JSON.stringify | 自定义会话数据的编码函数。 |
decode | Function | JSON.parse | 自定义会话数据的解码函数。 |
最后,文章篇幅较长,感谢大家的耐心阅读!🙏🙏🙏